Thursday, December 20, 2012

Create an Interactive Map in iBooks

Along with our Director of Admissions I have been working on an iBook guide for our school. One thing she asked me to do was incorporate a virtual tour of the campus.  I told her that I didn't know how to do that, I thought it was beyond my ability level (after all, I'm no programmer, those people are like wizards to me). She wouldn't let it go so I spent some time trying to figure it out.

"Some time" became days and then almost a whole week.

Here's what I managed to do:


Here's how to do it:  

Step 1 - Use the 360 Panorama app to create your panoramic photos. You will create an account and you need to upload your photos within the app so that they can be viewed online. (Tip: I "mounted" my iPhone with the app onto a tripod to take my photos.  They turned out a lot better than when I just held my iPhone and turned in a circle.) You will need to retrieve the URL of the panoramic photo you just uploaded.


Step 2 - Go to Bookry.com and look for the 360 Panorama widget.  (Bookry is so awesome, I can't say enough about the amazing tools available for creating your iBooks.) You will fill out some info including the URL of your uploaded panorama. You will also need to upload the image for your widget.  This is where I added our "Don" logo that you could see all over the map.   

Don logos on map
After this you will be able to export a widget. If you are going to use multiple panoramas you'll have to do this multiple times.

Step 3 - Add your widget to your iBook.  Using iBooks Author I made a page and added a map of our campus. I then dragged and dropped the widgets onto the map.  One thing important to know during this process is that you can use ctrl-click (right-click, two-finger-click) to bring up the options "Send to Back" and "Bring to Front."  I had to play with this a little to make sure my widgets were on top of the map and not underneath it.

Step 4 - Adjust your widgets.  Its easy enough to put the widget on the map where you want them.  However, I struggled with making the logos as small as I wanted them to be.  There seems to be a limit to how small you can make the widget on the page. You can select the widget and drag the white boxes and make it as small as possible.  But I wanted it smaller so I used the Inspector to turn off the Title, Caption, and Background.  Then I increased the margin.  Increasing the margin shrunk the logo even more. 

Inspector widget settings

This finally made the logo look that way I wanted it to.

Step 5 - Publish and enjoy! 

That's it.  I think I included all of the steps. If you have a problem or questions or a suggestion I'd love to hear it.

I hope this is helpful.  If you use this process to make something I'd love to see it.  Please share!

Wednesday, December 19, 2012

How to Embed a Google Form in an iBook

Back in the beginning of November I figured out how to embed a Google form into an iBook using iBooks Author and a program called Hype. (Special thanks to @anthonydilaura for his help.) Then I tried to do it again a few days ago and realized I had forgotten how.   Oops.  So I decided to write this blog post that describes the process so I'll have a record of what to do. Even if no one else wants to do this  I know I'll be able to come back to this post when I forget the process again in a couple months.

First of all, Hype is not free.  Its about $50. I have not been able to find a free way to do this.  I am sure someone with more programming skills than me could do it.  I bet there's a way to do it with Xcode developer tools but I don't know how to do that.

Also, some of the Google form settings I will describe are specific to a Google Apps for Education school.  Its probably simpler with a regular, free Google account.

Step 1 - Create a Google form.

Step 2 - Be sure to uncheck all of the boxes (see pic). I left "Require Cathedral . . ." checked and it caused all sorts of problems.  Of course, this means student could submit responses anonymously but I guess that's the trade-off.


Step 3 - Open Hype and start a new project. Use the Document Inspector to choose the page size you will use (I use iBooks Standard Widescreen).


Step 4 - Go to Insert Elements and choose HTML Widget.


Step 5 - Click little pencil icon and a box will appear. This is where we want to paste our embed code.


Step 6 - Go back to your Google form and copy the embed code.


Step 7 - Paste that code into the iframe window in Hype. Your Google form should appear.


I also like to stretch it out (drag the little circles) so it fills the whole page. This will take a little trial and error to see what you like best.

Step 8 - Export it as an iBooks Author Widget.  I like to save it to my desktop.


You should see a file that looks like this:


Step 10 - Open your iBooks Author project and drag and drop your widget to wherever you'd like it to be in your book. You can use the Inspector to make layout changes.


Step 11- Publish your iBook and enjoy the responses you will receive from your Google form!

Here's what it looks like in the iBook:


And after you tap the widget it looks like this:


If you have any questions or any feedback or any problems I'd love to hear about it.


Friday, November 30, 2012

Creating My Own iBook


I have been spending a lot of time working with iBooks Author lately.  I am a huge fan of this program and all of the possibilities it brings to the classroom.

I have been feverishly working on creating my own Government textbook for use in my AP class because, unfortunately, I have not found a good AP US Government and Politics textbook that works well on iPad.  There aren't any available in the iBookstore.  The one we are currently using requires a special app from the publisher and it doesn't work very well. This is disappointing because my students are paying for a book they can't access. Therefore, I have decided to work on my own text for this course.

(I realize that College Board will ultimately have to approve my book.  I have spoken with them a couple times and I believe my completed book will be approved as long as I include all of the required information.)

In this post I wanted to share the steps that I am using to create my iBook.

Step 1 - find an open licensed text to use as the base of your book. "Where will I find this?" Here are some suggestions:

CK-12
Connexions
Flat World Knowledge
OER Commons
Project Guttenberg
California Open Source Textbook Project

It is important to understand copyright and licensing.  I cannot recommend Creative Commons highly enough for this purpose. There is so much information available here as well as great search tools for finding more content.
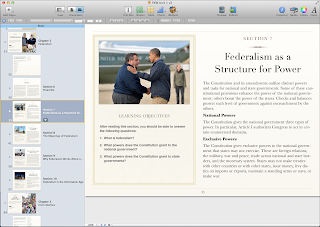
iBooks Author
Step 2 - copy/paste one chapter into iBooks Author. (You will need a Mac running OS X 10.7.4 or later.) This FREE program is powerful and easy to use. One thing I have noticed is to be aware of the copyright of the different media used in the book.  For example, I have found books where the text was licensed for reuse but some of the pictures were not.  For the most part, I do not copy the pictures or videos I find in the texts from step 1.


Step 3 - find pictures (and videos) for that chapter of your iBook.  Believe it or not, one of the first places I go for pictures is Wikipedia.  The vast majority of the pics on Wikipedia are licensed for reuse.  Another great source of pictures is Wikimedia Commons. Most of these pics are allowed for reuse.  It is very easy to include attribution in the iBook and a link back to the source of the picture.

Step 4 - Build assessments for that chapter. "This seems like a strange step in the book-making process." Yes, it does.  But so far its working for me.

The reality of teaching an AP course is that students have to be prepared to take a big exam in May.  I do not create this exam, College Board does.  I, and other AP Gov teachers around the world, have to make educated guesses at what we think will be on that exam and do our best to teach that information to our students.

I like to create the assessments that I will use for each chapter before I finish. This way I can go back and make sure my book covers everything that I want my students to know about this topic. I think it is unfair to ask students questions on an assessment that the teacher has not given them a fair opportunity to learn.

I have several question banks that I draw from as well as released old AP exams. I also like to use one or two test prep books to looks for topics I might be overlooking. Once I have used all of these resources to make a bank of possible quiz/test questions for the chapter I go back and make sure all of it is covered in the text.

After that I create a list of "Gotta Knows" (a term a stole from another AP teacher a long time ago, I don't remember who but thanks anonymous educator).  These Gotta Knows are all of the main concepts that students will need to know in the chapter.  I then include it in the book on one of the first pages so they know what key things to look for as they read.

Step 5 - Make a lecture video for that chapter. This step is still in my planning stages.  I haven't completed this yet. I have made lots of lecture videos but they have been based on the textbook we were using at the time. Every time we switch books I have to make new videos.  Some day I will be smart enough to make the videos generic enough that I don't have to constantly redo them.

My plan is that the lecture video will highlight the most important parts of the chapter and I will be sure to cover any topics that are "Gotta Knows" but are not covered adequately in the text.

These videos can easily be added to your iBook so students will have it available as they read the text.

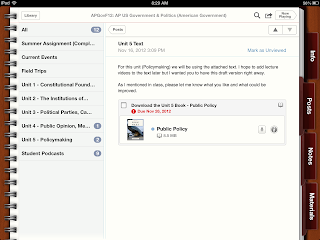
A screen shot of my iTunes U course
Step 6 - Share with students.  I am using iTunes U with my students and this is a great way to distribute iBooks.  If you would like to learn more about iTunes U check out this Teaching with iPad and iTunes U webcast series (I'm actually featured in part 1).

If you would like to see some of the iBooks that I've created I have posted them in my AP Government iTunes U course.  You can enroll in the course by selecting this link from an iPad or iPhone.

 Let me know what you think.  I appreciate any suggestions and I'm happy to answer any questions you may have. I'm also looking for other Social Science teachers who are interested in collaborating on creating our own iBooks.

(Find me on twitter @Mattbaier1234)

Monday, October 15, 2012

SDCUE - November 3

In a couple weeks I will be presenting for the first time at an SDCUE event. I am very excited about this opportunity.  I attended this conference last year and learned a lot of great information from some very talented presenters.

I will be sharing some of the valuable information my school has learned as we are now an iPad 1:1 school.  One of my presentations will be about using iTunes U with our classes.  This has been a very positive experience for the students and teachers who are using this tool.

Here is a google site that I created that contains resources that I will be using during my presentation (as of today, 10/15, the site is not yet complete).

I am also very excited to be presenting a session with my colleague and good friend, Kathy Garcia.  We will be presenting tips for a paperless iPad classroom.  Kathy is a fantastic presenter and I think this will be really great.

Here is a google site with info about our "Becoming Paperless" session (as of today, 10/15, the site is not yet complete).


Sunday, May 13, 2012

Organizing 500 Paper Submissions Using Google Apps for Education

I have been so busy at work lately that I haven't had any time to work on any "fun" projects. Well, last week I finally got something fun to do.

I work at a wonderful Catholic school.  One of the best things about it is that our students participate in a Christian Service Program.  Prior to this year I would consider it a typical service program where each student is required to do a certain number of hours each year.  However, this year we have taken a new approach under the leadership of our Director of Christian Services, Dawn Brannman.  Each year students will have a different area of focus: freshman year - work with poor/disadvantaged, sophomore year - work with children, junior year - work with sick/elderly.

This year is the first year of this new program and we started with the freshman class.  They had to complete their hours by working with the poor and disadvantaged population. In addition, freshman students went in groups of 20, along with a teacher and some parent volunteers, to serve at a local homeless shelter.  It is my understanding that every freshman student participated this year.

Additionally, each student is responsible for writing a reflection paper about their experience each year.  This is a new requirement and this is where I come in.

Dawn came to me to see if we could come up with a manageable, digital, process for collecting all 500 of these reflection papers.  Her plan is to have her senior Campus Ministry Service class "grade" the papers and provide feedback according to a rubric that she has created.

After meeting with Dawn, here is the plan that we came up with:

1. Students will upload their Reflection Papers to their Google Docs account.  This is new for us as we just recently became a Google Apps for Education school. (This also assumes that students didn't write their paper in Google Docs - which actually makes to process easier.)

2. Students will copy the URL for their Reflection Paper in Google Docs.

3. Students will paste the URL into a Google Form that I helped Dawn create.

4. Dawn will give her senior Campus Ministry Service students access to the Google Spreadsheet that is created by the Google Form submissions.

5. The Spreadsheet can be sorted in manageable groups and these groups can be assigned to each Senior student. (We have something called L.I.G.H.T. groups, it is similar to a homeroom, this is how the submissions will be grouped.  It is a part of the Google Form.)


6. The senior students will then email their feedback to the students who wrote the papers.


I then had to make directions for students to submit their papers this way.  I made a text version and the video version below.  I am hoping this is clear enough for them to follow.


The students will not be given these directions until the end of next week. Therefore, if you notice any mistakes I've made or have any suggestions please share them with me. I still have a few days to make changes and I really want this to be successful.

Thanks.

Thursday, April 5, 2012

Teacher iPad Rollout - Initial Thoughts


Today was a big day for our schools community; teachers and administrators received a new iPad of their own.  Up until this point we had been sharing iPad2s.  Each department had one and there were about 200 that teachers could check out to use with their classes.  However, this is not a true iPAd experience because the device is most valuable when the user is able to personalize it.

I am excited for my colleagues to use our Easter break as an opportunity to get acquainted with their iPads.

In preparation for today, one of the things we did was to make a PowerPoint presentation to guide everyone through each step of the process.  I know, PowerPoint is old and lame.   But its also easy to use and works on almost every computer.  We had 6 different people leading our rollout process and we needed to make sure everyone was able to display and use the same thing. And we only had a couple days to do it.

We had targeted today as our rollout day because it was a scheduled teacher in-service and the last day before our Easter break.  It seemed like the perfect way to get people to actually show up for an in-service the day before a long break as well as a good opportunity to give teachers the iPads with time to play with them.

Back to the PowerPoint. I lost count but I believe there are more than 67 slides.  We tried to make a slide and take a screen pic for each step.  And when I say each step, I mean each step.

Some teachers are not at all familiar with an iOS device.  Many don't have a smart phone. Several only had one email address, the one our school provides them for work.  We needed to make sure each step was as clear as possible.  Also, not all of our presenters were intimately familiar with the iPad.  They are all intelligent and tech-savvy, but you could hardly fault them if they forgot how to do something they themselves had just learned two days ago.

So that's how we ended up with the giant (100mb) PowerPoint presentation. The best part of the presentation was the title slide.  It is the same as the pic at the top of this post.  One of our very talented science teachers (Steve Anderson) drew that with the Bamboo Paper app (after only having his device for about 24 hours).

Our plan was to have teachers arrive in the lecture hall to pick up their device and then go out in groups of 15-20 with one of our 6 group leaders.  They went to a classroom where they would be guided though each step of the set up. Everything went as well as expected.

Actually, probably better than expected. We only had one real problem and we were prepared for it.

We had decided that teachers would use their own Apple ID with the device. This way they would be able to install their own apps on the iPad. Also, they would be able to "keep" any apps the school purchased for teachers. (This made me regret buying my own copies of the iLife and iWorks apps several months ago, but oh well).

The problem was that some teachers did not properly create their own Apple ID.  We tried very hard to check with everyone to make sure that they had created and verified their Apple ID before they arrived today but there were still a handful of people who needed extra assistance.  So, we had two more tech leaders available with laptops back in the lecture hall to help with this.  If during the enrollment process someone couldn't remember their Apple ID or password or had some other problem, they could leave to get extra assistance and the rest of the group could keep moving on. Then those people could rejoin a later group to catch up.

I'll be honest, this could get awkward when we had to ask some people to go back to the lecture hall for extra help. However, for the most part it went very well and helped keep our process moving along.

As I've been writing this I've been trying to think of what I would do differently.  This is especially important because eventually we will have to do this with 1700 students.  But right now I can't think of anything.  I will be sure to write another post after I've had some time to reflect some more on our process today.

Overall, I think people were satisfied.  Hopefully they will get a chance to spend some quality time with their device over the break and will come back ready and willing to try new things in their classes.

Thursday, February 16, 2012

How iPads have already made our school better (and most people don't even have one yet)

Our school officially announced our 1:1 iPad program for the 2012-2013 school year. We were covered in our local newspaper (http://www.utsandiego.com/news/2012/feb/14/school-plans-ipads-for-all/) and this has generated some discussion.

As I have been very involved in our preparation I feel defensive about what we have done. I read some of the article comments and the negative ones really stick with me. I want to argue and explain why this is a good thing. A lot of the comments are about using electronic textbooks. I understand the allure of that. Other comments are about why a different device would be better.  I understand that also.

I think that many of these people are missing some of the best things about our using iPads and being a 1:1 school.

I want to share a list of some of benefits that I have seen.  What is particularly interesting about this list is that most teachers don't even have an iPad yet (maybe 5 out of 100) and our student population of 1700 is sharing only 200 iPads.  These are benefits that I have seen just as we are preparing to get iPads.

1. Collaboration among teachers - I have seen and participated in collaboration among teachers of the same class, teachers within the same department, teachers of the same grade level, and even teachers who have no connection other than they work here and are interested in doing new things. The amount of collaboration I am seeing is tremendously encouraging.  I have been teaching for 12 years and I have taught in several different schools from grades 6 to 12. Nowhere have I seen as much sharing and collaboration as I am experiencing this year.

2. Teachers teaching teachers - Teachers have been empowered to share what they know and how they are teaching with their colleagues.  Before this year, faculty in-service days had been "top-down" style. Someone would talk to us (oftentimes a consultant who had been hired to speak) and we would listen and then they would leave.  Now teachers are planning and leading the in-service days and we are learning from each other and gaining a new appreciation of the expertise of our own colleagues.

Also, teachers with varying levels of technology expertise are sharing. Some people are very tech savvy but even teachers who are new to these tools and techniques are willing to share their own successes.

3. New teaching styles - More teachers are moving away from lecture and worksheet based instruction. Even without having iPads for each student yet, this transformation is already happening.

4. New role for students, opportunity to teach teachers - Students are being given the opportunity to act as leaders within the classroom. Many teachers are looking to students to help problem-solve tech issues or suggest tech ideas and this gives them more ownership of their own learning. Hopefully this will continue in the classroom into areas outside of technology use.


5. Facilitating communication using new tools - Teachers and administrators are starting to use new ways to facilitate communication.  We are cutting down on the use of paper and increasing our use of tools like Discussion Forums and Google Forms to brainstorm ideas and provide feedback.


6. More collaboration with other schools - We have eagerly sought out other schools who are doing similar things as us.  Some of these are Catholic schools like our own but we have also benefited from discussions with colleagues at public schools. It feels like we are opening up and joining together in a common mission, rather than closing ranks and treating each other as competitors.


These are just some of the changes that I have already seen. The learning experiences of our students and the culture of our school is advancing rapidly. What is it going to look like next year? I don't know, but I'm very excited to find out.

Tuesday, February 14, 2012

Workflow: How do students submit iPad work?

One of the simplest ways for students to submit work from their iPads is to use email.  However, if you have 120+ students this can make a big mess of your email inbox.

Here's another way to do it:

This method requires a bit of initial set up but once you have everything you need ready, its pretty simple.

Step 1: Set up a dropbox account. It is free and easy and super useful.  Your students will thank you for teaching them how to use it. You should also install the dropbox app on your iPad.


Step 2: Set up a sendtodropbox account. This is free and simple. You will then have an email address to which you can send files and have them added to your Dropbox.  Many apps don't require this step, they will allow you to upload to your Dropbox directly.  However, some apps don't play as nicely with Dropbox (i.e. Pages) and you will need this eventually.


Step 3: Copy the link. In the Dropbox app you want to select your document and then tap the link button (it looks like a piece of chain). Then choose "Copy Link to Clipboard."


Step 4: Paste the link into your Google Form. This step requires that you have already created a Google Form and put it somewhere that students can access it.  I like to put my Google Forms on my Google Site.


Step 5: Open your Google Spreadsheet to access the student link and record comments and/or score.


I know there must be an easier way to do this.  But this is the best I've got for now. 

Any suggestions and/or feedback is appreciated!

Monday, February 6, 2012

Using Flash on the iPad - Puffin and Rover to the Rescue

In my role as a technology trainer at a school that is preparing for a 1:1 iPad roll out next year I constantly find myself defending the iPad. When I was first asked to do this job I thought I would be teaching people how to integrate technology into their lessons using the iPad, not working as an iPad apologist. I didn't choose the iPad instead of laptop, that decision was made before I was part of this team.

Does that mean I think the iPad is the wrong choice? No, it doesn't. I really like it a lot.  In the future I will write a blog post about why I like the iPad.  But this is not that post.


One of the most common concerns I hear about the iPad is that you can't access Flash content on it.  I used to share that same concern.  There are many valuable Flash-based videos that are currently only available in a Flash format. The solution to this problem - Puffin Browser. This browser app does a great job of displaying flash videos.  We have been using it for months with great success.


However, Puffin does not handle Flash-based games. This is especially frustrating for me as a Government teacher because one of my favorite sites is iCivics (if you have never seen this site, I highly recommend it). iCivics has lots of great games where the player pretends to be everything from the President to a lawyer arguing before the Supreme Court. The drawback to iCivics has been that it is Flash based.

Then along comes Rover. I discovered the the Rover App a couple months ago and it has been one of the highlights of my year (this seems melodramatic but I REALLY like iCivics).  Rover allows you to access Flash content including Flash games. It takes a little practice to get used to and it isn't perfect yet, but they are constantly working to improve it.

I am not sponsored by them, I do not know anyone who works there, I have no interest other than wanting to be able to use Flash on my iPad.

If you are in my position and are constantly bombarded by people frustrated by the inability to use Flash on the iPad, tell them about Rover. That's what I do.

Sunday, February 5, 2012

First Time with iBooks Author - Student Saves the Day

On Wednesday some of my administrators asked me to prepare a presentation for a group of parochial school (K-8) principals who would be visiting on Monday. They wanted me to show how were are currently using technology in the classroom.

And they wanted to see the first draft of the presentation by Friday.

And I wasn't going to be at school on Thursday because a group of us were going to visit a school that has already implemented a 1:1 iPad program this year (we are doing it next year).

And someone suggested that I use Prezi, which I've seen, of course, but never actually used myself.

And someone else suggested I include something about iBooks Author.

I thought that last part was kind of funny.  I mean, iBooks Author is like 2 weeks old, right? Luckily, as soon as it was announced I scrambled around campus for a computer that I could install it on (my classroom computer runs Snow Leopard, not Lion yet) and started playing with creating books.  The next day I took about 20 minutes to show a student (Jake) how to use it and asked him to start playing around with the program. This student has one period where he is an assistant in our tech office and whenever it looks like they don't have much for him to do I try to steal him to help with my stuff.

So I spent about an hour on Wednesday learning how to create a Prezi and collecting some work samples to use for my presentation on Monday.

Then on Thursday, as we are in a van driving up to visit the other school, someone bring up iBooks Author again. I realize that if I'm going to present something about it on Monday I'll need a sample.

From the back of the van I emailed a friend in the tech office back at school and asked them, "if Jake isn't busy, can you have him make an iBook?" It could be about anything, as long as I would have a sample to share. 

Well, good ol' Jake came through for me. He created an iBook about how to use iBooks Author. It's simple, highlights some of the key features of the program, and best of all, was done in less than an hour. (Download Jake's book here - you'll need an iPad to view it).  By the time we got back to campus he was ready to show it to me.

In order to show it in the Prezi I made a short video of myself flipping through the pages:


I think its important to point out that Jake is not a computer geek. He's plays ice hockey and manages his friend's band.  Jake does not normally spend a ton of time in front of the computer. I think he signed up to be a tech aide so he could do his homework at school. And yet he was still able to pull this together for me.

I think this shows just how easy iBooks Author is to use.  I can't wait until I have time to start creating my own books with it.

Saturday, February 4, 2012

New Faculty Training Model

(When I started blogging my goal was to post once a week.  That has turned out to be much harder than I thought.)

Last week we had a half day faculty training day.  This day was unique for us because faculty members were allowed to plan and run the training sessions. We were broken up into grade level teams (9th, 10th, 11th, and 12th) which made 4 groups of 20-25 teachers.  Each group had two faculty leaders to organize their team's meeting.

I was very excited about this and got right to work planning our (12th grade) meeting along with my co-leader.

I wanted to provide an opportunity for teachers to share how they had been using technology in their classrooms this year. During most of the previous training sessions the presenters were hand-selected and I thought we might be missing some really cool stuff that others were doing. Two weeks before the training date I sent an email to all of the members of my group asking what they were doing in class with technology. If ANYONE responded, I followed up and personally asked them to share. I didn't want to only see teachers who were experts and were very comfortable with how they were using tech.  It was important to also see teachers who are tech novices share what was working for them at their current level of expertise. 

By communicating directly with some of these teachers I was able to provide encouragement and find out what help they might need from me to present (i.e. have an iPad to VGA adapter available). I wanted their experience to be as comfortable as possible so that they would be willing to share again and so that others would be willing to share in the future.

I scheduled 10 minutes for each person. I made this clear in the beginning because I did not want to have a step by step clinic on how to use the tech, I wanted it to be "show-and-tell" style. I thought this was good because we could see many teachers present in a short amount of time and they didn't need to prepare a whole 30-40 minutes. I told them to shoot for 5-6 minutes of show-and-tell and use the remaining time to answer questions and allow for discussion of how this could be applied to other classes and disciplines.

Because this was our first time using this system, I didn't know exactly how much time we would actually use. So I scheduled my self and my co-leader for the end of the day. This way we could fill in extra time if the earlier teachers went short. Also, and I think more importantly, we could cut ourselves out if we were running out of time.  This way no one would have hurt feelings as we knew we might not get a chance to share before the day even started. As it ended up my co-leader was able to present but I was not. That is fine because there will be plenty of opportunities for me in the future.

At the end of our session we conducted a feedback survey using a Google Form. My co-leader was kind enough to prepare this before the meeting and we had enough iPads available for everyone to use and fill out the survey right away. This served two purposes: 1. we were able to easily get immediate feedback in an organized way and 2. we were able to model the use of Google forms for the teachers who had never seen it before.

How did the teachers feel about the training day? We received very positive feedback.  Just as we had hoped, many teachers responded with requests for more training with some of the tools presented that day.

How did the admin feel about the training day? I believe they liked it as well because twice I have heard them brag about it to people from other schools.

Have you done anything similar? Do you have any faculty training successes to share?

Tuesday, January 17, 2012

I'm Going to a Conference, I'd Better Make a Plan . . .

A picture of me during a recent conference.  I sent this pic to my friends in other rooms to show off the awesome leather chair I found to sit in.

Recently, myself and a few colleagues have become very interested in attending conferences. Before this year I don't think I had attended a conference since I was a student teacher (10 years ago?). Currently we are preparing to go to the OCCUE Techfest. As a group we have made it to at least two other conferences this year.

I am curious about how other people prepare to attend a conference. Here's what I do:

I begin as soon as the schedule of presenters is posted. I know, oftentimes there will be changes but I can't help it. I get excited about this stuff. I start by looking at all of the presentations during each session and circling (or copy/pasting to a doc) all of the presentations I'm interested in.

I take that list and google the crap out of the presenters. This might be creepy but I'm trying to learn more about the presenters.  I am mostly interested in what grade level they teach (hopefully high school) and what subject they teach (hopefully Social Studies). I'm also interested in finding out if they have a blog or they post on twitter.  I have found this is a good way to learn about their interests and expertise.  Sometimes you can even find resources from previous presentations (slideshare, prezi etc.).

After I've done this, I rank the presentations within each session by how much I want to see them.

Then I try to convince my friends to attend my second and third choices in each session.  You know,  a little divide and conquer.

Just kidding, I don't really do that. What I really do it sit down with my friends who are attending the conference and we talk about what we really want to see.  Sometimes more than one of us really wants to see the same thing and we'll all go.  Other times one of us doesn't feel strongly about a session and will go to someone else's second choice.  It really depends.  This is one of my favorite parts of the whole process, discussing which sessions we should attend.  It forces us to decide what will be most useful for ourselves, for our department, and for our school. Maybe there is something that looks cool but might not have a practical application in our school community. We are better off spending our limited resource (time) somewhere else.

Once we have determined our schedule we are ready to attend the conference.

Sometimes, there are challenges on the day of the conference.  I recently attended a conference that had tons of people.  Way more than the organizers were expecting.  The problem was that many presentations filled up. When this happens I have two different strategies.  One is to attend the presentation that is in the room immediately before the presentation that will fill up. If I want to see the presentation in room 123 during session 2 but I'm afraid it will fill up, I will attend whatever presentation is in room 123 during session 1.

The other strategy is to skip a session and wait in line outside of the room you want to be in.  I skip the presentations during session 1 so I can wait outside room 123 for the session 2 presentation.


Here's a picture of two of my friends during a presentation. They were only moderately interested in this presentation and wanted to make sure they had a seat for the next presentation in this room. I took this creepy picture because I was in line outside waiting to get into the room next door.


I have done both of these. Be careful about using the first strategy though.  Sometimes organizers will try to kick everyone out of the room after each session.  If that happens, then you sat through a presentation you weren't really interested in for nothing.

After the day is over, how do we share all that we've learned with our colleagues? We create a Google Doc (see sample from a conference earlier this year). This allows us to give thoughts and feedback on presentations we saw that day and to include links to the presenters' resources.

If the conference was good, our final step is to look at the calendar and figure our which conference we will attend next.

Any tips you'd like to share?

Friday, January 6, 2012

Website for iPad Preparation

Next year we will have iPads. Everyone in the whole world.

Well, I guess not everyone but sometimes it feels like that.  The students will all have iPads.

One of the things I've been working on is a website that can be a one-stop shop for kids each day in my class. I envision them walking in and going straight to a webpage that will have a collection of the resources/activities/information that they will need for that day. This will also be valuable for students who miss class that day.

Here is what I have so far - Baier Government


I think the key is the calendar page. This is where students can get their information for each day. I am trying it out this semester after spending much of my Christmas Break working on it.  However, I have to share the iPads with the rest of the school so my students don't get to use them everyday. I'm hoping that it will still be valuable, even if students are accessing it mostly from home.


I would like to give a special thanks to Reuben Hoffman. I was inspired largely by his class website and stole many of my ideas from there.

Any feedback is appreciated and I will be sure to share what works and what doesn't as the semester progresses.